| « | An AAF officer looking to defect offers the guerrillas a chance for revenge. Mission Description
|
» |
Exit Strategy is the fourteenth mission of ArmA 3's The East Wind campaign.
Quotation[]
| « | It is not the strongest that survives; but the species [...] that is able best to adapt. Leon C. Megginson, 'Lessons from Europe', Southwestern Social Science Quarterly (1963)
|
» |
Overview[]
The player controls FIA squad leader Ben Kerry. A high-ranking AAF officer, known only by his codename of "Orestes", has reached out to Stavrou and seeks to defect to the guerillas. Kerry must meet with the officer and escort him safely back to base.
Kerry's role/class:
- Infantry / Grenadier
Default loadout:*
- Primary weapon: TRG-21 EGLM (7× magazines)
- No attachments fitted
- Secondary weapon: ACP-C2 (3× magazines)
- No attachments fitted
- Equipment: RGO (2×), Smoke Grenade (White) (1×), Smoke Grenade (Green) (1×), 40 mm 1Rnd HE Grenade (4×), Smoke Round (White) (2×), Smoke Round (Green) (1×), Smoke Round (Red) (1×), Smoke Round (Blue) (1×), Chemlight (Blue) (2×), Chemlight (Green) (2×), Explosive Charge (1×)
- Backpack: Field Pack (Olive)
(*) This is the default loadout assuming that the player has not customised or collected different items from the previous mission.
Objectives[]
Primary[]
- (1) Get to the RV
- (2) Wait
- (3) Intercept the pursuer
- (4) Prepare Ambush
- (5) Repair Depot Sabotage
- (6) Helicopter Ambush
- (7) Return to Orestes
Optional[]
N/A
Mandatory[]
- Kerry must survive
- Orestes must survive
- If selected, the CSAT helicopter with reinforcements aboard must not escape
- Avoid collateral damage/friendly fire
- Remain within the combat area
Walkthrough[]
Primary 1: Get to the RV[]
Move quickly to the rendezvous point near an abandoned home just north of your starting location.
Primary 2: Wait[]
Wait for the defector's MRAP to arrive. He (Orestes) has two other troopers defecting alongside him so watch your fire and don't shoot them by accident.
Primary 3: Intercept the pursuers[]
A four-man team of suspicious CSAT soldiers have tailed Orestes to the meeting.
They'll be arriving just up the dirt road from where Orestes came in. If you have an anti-tank launcher, an AT grenade or two will be sufficient to blow up their MRAP quickly and take all five soldiers with it. Guided missiles also work, though you need to be quick with the lock-on so that the soldiers don't manage to disembark before the missile hits.
Either way, get rid of the CSAT fireteam as soon as possible. Be careful of the grenadier and autoriflemen as their weapons can make short work of you and your allies. If Orestes is killed in the firefight, the mission will automatically end in failure.
Primary 4: Prepare Ambush[]
After the fireteam is dispatched, you now have the option of choosing to either sabotage the CSAT tank repair depot or shooting down a transport helicopter loaded with reinforcements.
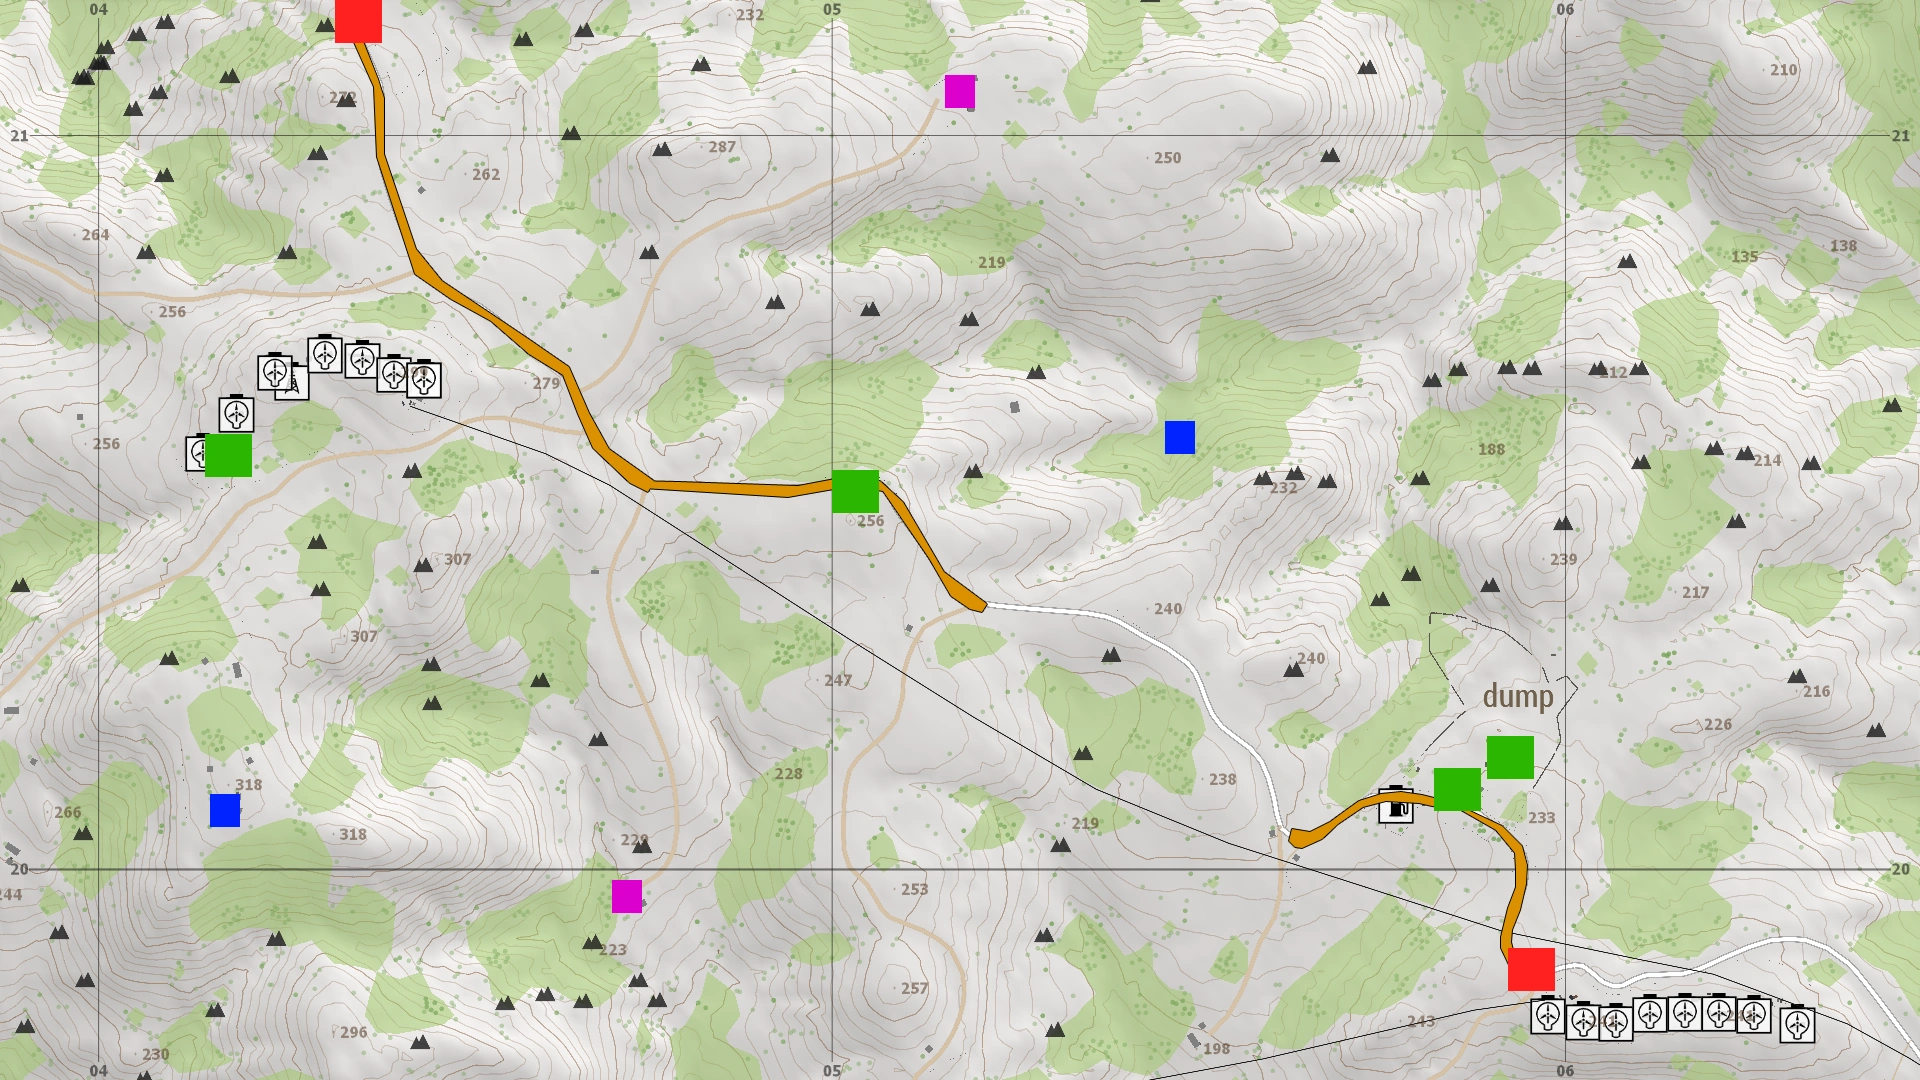
LEGEND
Green: Patrols/static guardsmen
Red: Patrolling vehicles
Orange: Vehicle patrol routes
Violet: Weapons stashes
Blue: FIA scouts (reinforcements)
Pick one of the two options (see the two Primary objectives below) and then proceed to clear the site(s) of enemy threats. For instance, if you want to destroy the tank depot then you must get rid of the engineers and their guards protecting the facility (including the armed MRAP parked outside the main entrance). If you opt to destroy the helicopter, then you must get rid of the sentries patrolling around the marked ambush point.
Note that until all threats have been eliminated it will not be possible to activate either of the follow-on objectives. It is also not possible to do both objectives at the same time; you can only choose one or the other even if you clear the enemies at both sites.
Primary 5: Repair Depot Sabotage[]
NOTE: This primary objective only triggers if you opt to destroy the tank depot.
Eliminate all seven of the engineers and support personnel defending the tank depot. The infantry are easy to tackle but the grenade launcher-armed MRAP patrolling in front of the entrance may prove to be a problem if it's not dealt with first. The driver moves quite quickly so avoid using unguided RPGs and stick to the guided PCMLs instead. One good missile hit should instantly blow up the MRAP or at the very least result in a mission kill.
Once the MRAP's gone, be sure to keep your distance and only move in to kill any stragglers garrisoned inside the compound. A longer-ranged weapon such as the Mk14 or Mk18 ABR with a bipod and/or suppressor fitted works best. There isn't a decent vantage point to snipe from however, so you'll have to move inside to mop up any stragglers hiding at the back where the tanks are.
When the last soldier has fallen, radio Orestes to give the green-light for an artillery strike against the depot.
Primary 6: Helicopter Ambush[]
NOTE: This primary objective only triggers if you opt to ambush the helicopter.
A five-man patrol team will constantly walk around the base of the wind turbines. However, they aren't your biggest threat: that title belongs to the patrolling Marid APC which will constantly drive in a loop along the road next to the turbines. It moves fairly fast so unguided launchers are not a good option unless you're absolutely confident with your aiming skills. Stick to the PCML or even the Titan (if you brought one) for more reliable results.
As soon as the last soldier has been killed, you can prepare any style of ambush of your choosing. Before attempting any of these routes, save your game and order your AI subordinates (if you brought them along) to Hold Fire. Once you're ready, tell Orestes to request for support:
- AA missiles
- The easiest method that doesn't even require you to bring special equipment along. One of the (dead) patrolling soldiers is an anti-air missile specialist. His Titan launcher and accompanying backpack contains two spare missiles for a combined total of three shots. Throw a smoke at any valid position near the wind turbines and wait for the pilot to commence his landing.
- Lock-on and fire away the moment this happens. At this altitude, distance and velocity, no amount of manoeuvring or flares by the pilot will allow him to avoid the missile in time.
- Small arms
- Have your team set up positions overlooking the intended LZ. Once everyone is prone and ready to fire, throw a smoke at the desired spot.
- When the pilot is about to land, order your team to Open Fire and focus on the pilot and his co-pilot first. If done correctly, your team's combined fields of fire will quickly result in the helicopter plummeting uncontrollably to the ground and crash into a fireball shortly thereafter.
- Explosives
- Demo charges can be used to blow up the helicopter as soon as it lands on the ground to drop off its cargo. Place at least two charges to guarantee its destruction. Make sure you throw a smoke grenade directly on top of the explosives as it will be the exact location of where the pilot will land.
- Save before attempting this method as it can quickly go wrong if you miscalculated the grenade throw or the pilot didn't land atop the explosives.
No matter the method, you can only trigger the pilot to land with a smoke grenade (it does not have to be a specific colour). The smoke grenade needs to land on a valid surface, meaning it shouldn't be thrown at the base of the turbines, on top of any wrecks or the nearby forest.
Be sure to not throw the grenade too early however, as it may time out before the pilot can get close enough to identify its position. Lastly, be mindful not to expose yourself until the pilot commences his landing approach as you will fail the mission if he detects your presence and flees successfully.
Primary 7: Return to Orestes[]
Head back to the rendezvous point where you initially linked up with Orestes. Once Kerry gets within 20 metres of either Orestes himself or Lieutenant James, some dialogue will commence before the mission ends in success.
Tips[]
- The two stashes at grid 047-199 and 051-210 contain a decent stockpile of ATGMs and demo charges. Though they're not especially useful, you can quickly rearm yourself and your subordinates if you happen to be using the PCML.
- Be careful of the motorised rifle team standing along the road bend at grid 050-205. They may occasionally react to your team's gunfire at the tank depot and respond accordingly by moving to engage you.
- Before assaulting the tank depot, you may want to link up with Kappa and Sigma at grid coordinates 041-200 and 054-205 to get some reinforcements of your own. A little bit of extra manpower never hurts after all...
- Leave behind your AI teammates with Orestes if you choose to ambush the helicopter. They will be more of a hindrance than help as the helicopter pilot can potentially spot them and botch the mission.
- That is, unless you are specifically opting for the small arms approach. In which case, be sure to command them to Hold Fire and go into STEALTH mode (and go prone) until you are ready to strike.
Trivia[]
- Depending on the player's choices throughout Adapt, the mission can actually take place on July 21st as opposed to its canonical (according to the official Armaverse Timeline) starting date of July 22nd.
- Orestes will angrily complain if he and his fellow defectors are forced to fight off the CSAT troops on their own (either because the player abandoned him during the firefight or took too long to arrive).
- The pilot of the CSAT helicopter, callsign Hydra, shares the same identity with his playable counterpart in the Helicopters and Gunships showcases, though the events of both are obviously non-canonical.
- The artillery "shells" fired at the depot are not actually launched from a physical gun battery but are created through scripts which spawn the 155 mm shells at random positions within the impact zones.