The players control four characters from the U.S. Army's Task Force Knight. Loy Manara's airstrip has been successfully captured and TF Knight can now proceed north into the Naran Darre pass.
However, with Takistani Army troops still present in the surrounding area, TF Knight must first carve a path through the militia-controlled valleys.
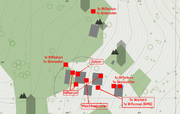
You start off at FOB Revolver. The convoy is waiting for you at the main entrance and comprises of an Abrams tank and three Bradley IFVs (an M2A3, M2A2 and one M6).
Herrera/Drake:
When the briefing with Colonel Kane is finished, head downstairs to the motor pool area and hop into the commander seat of the tank. As Drake, board one of the IFVs as a passenger (or vehicle commander if you prefer) and wait for the rest of your squad to get in.
Once everyone is mounted up, go west through the valley and turn north at the T-junction at grid coordinates 075-019. Continue north; you will soon encounter isolated groups of militiamen and the occasional armed offroad but they aren't much a threat to your vehicles.
As Herrera, don't forget to load high-explosive (HE) shells and not sabot (AP) for the main gun whenever engaging non-hardened soft targets. Switch to the coaxial machine gun for infantry or static defences.
Follow the road through the valley. There is no need to deviate from the main path. Graves' team should have eliminated most of the threats at grid coordinates 091-044, but you'll still need to watch out for the T-55 tank and SPG-9 turrets blocking the path.
As Drake, you can dismount at Naran Darre and link up with Graves to breach the structures at the fort and surrounding villages that may still have militias inside.
As soon as the briefing ends, you'll be airlifted via helicopter and dropped on top of the hill at grid coordinates 100-048. You need to clear two spots of enemy troops: the farm at 098-043, and the outpost at 092-047.
Aim to clear the farm first. It's lightly defended with only fourteen militias patrolling and standing idle around it. The only target you need to watch out for is the sniper but the rest should be simple enough to pick off from afar.
When the farm is emptied of threats, you can either move through the forest west or go north to the peak at 096-049. Fourteen militias occupy the fort at the rocky hilltop with a bunch of trucks parked nearby. A T-55, three armed trucks, and a scout car will be at the base of the valley.
Be careful of the static heavy machine gun turrets, particularly the one at the fort as it can fully rotate in your direction (the other is mounted on a lowered tripod).
Do not provoke the tank's crew. You don't have the firepower to take it out, so request for help from callsign Cruncher or alternatively, wait for Pierce to fly in and knock it out with Hellfire missiles.
Once Herrera's convoy has arrived, join his convoy and clear any remaining structures with Drake's help.
Pierce:
Pierce has the easiest job out of the four characters. Spin up your helicopter's rotors and take off in the direction of the first checkpoint. From this point onward, you can either escort the convoy by providing overwatch from above or simply clear the path ahead of whoever is controlling Herrera/Drake.
Help ground troops whenever they come up against armoured threats. For everything else, use the 30 mm chain gun or 70 mm rockets.
Unlike the last mission, there's minimal anti-air threats so you can fly at a lower altitude to make it easier for your gunner to lock onto infantry targets. The only time you should be wary is when you assault the main camp south of Timurkalay as it is defended by an Mi-24 gunship. Prioritise taking out the gunship or else Herrera's convoy will be in trouble (especially if their M6 Linebacker is out of action).
Primary 2: Clear the Strongpoints[]
Runs concurrently with the first Primary objective. You have to destroy the three strongpoints at grid coordinates 076-029, 078-036 and 087-037. All strongpoints are protected by a mixture of light infantry, militia and unarmoured gun trucks/scout cars so you should have no trouble tackling them head on.
Mark the targets with artillery from this vantage point.
The final strongpoint is the military camp at 087-048. It is heavily defended by a mixture of T-72s, T-55s and BMPs.
Fortunately, you've got plenty of fire support on standby and can hit everything below from the ridgeline at the peak of the valley. If Pierce did not destroy the enemy gunship, blow it up as Herrera with a single sabot or HE shell. Call in artillery via the Communications Menu and eliminate the remaining stragglers with MG fire.
Be aware that two T-34s may attempt to flank you from behind while clearing the camp. They will approach from the south-west, though your convoy's IFVs should be able to easily knock them out with TOWs.
After securing FOS Planck, you'll be given the option to decide on whether to help the locals or ignore them (see Optional objective below).
Primary 3: Secure the Crash Site[]
Regardless of whether you chose to assist them or not, move west towards Mohican 5-1's crash site at 065-048.
Herrera:
You'll have contend with more militia and several armoured vehicles ranging from BTRs and T-34s. Alternate between sabot/HE and coaxial MG fire to deal with each appropriate target.
You may want to transition to a Vee formation as you'll be on open ground from here on out. Column formation won't be helpful and may be counterproductive as it'll obstruct the line of fire for the rear two IFVs.
Drake/Graves:
Mount up onto the IFVs or take one of the nearby armed troop transports to drive there yourself. Support Herrera's convoy whenever you can but don't overextend yourself, especially against the T-34s and RPG-wielding soldiers.
The crash site itself is guarded by a squad of Takistani elite guards. Attacking them from a distance (one kilometre or more) with something like the 12.7 mm heavy machine gun on the HMMWVs is recommended as they can easily wipe out your allies if you get within range of their small arms.
Pierce:
Continue providing air support. You may be running low on ordnance and/or fuel at this point so resupply from the logistics trucks at FOS Planck first before heading for the crash site.
As you get closer to the crash site, be aware that friendly guerillas will be approaching from the south-west. Once the wreckage has been secured, another cutscene will play and you'll be given the option to either trust the guerillas (which ends the mission; highly recommended) or not (which prolongs the mission; not recommended).
Optional 4: Locate the Captives[]
NOTE:This objective only activates if you decide to not trust the guerillas.
Herrera needs to take command of the loitering UCAV and identify the location of where the survivors may have been taken to:
The mining complex at Feruz Abad (grid coordinates 050-068)
The military outpost at Garmsar (grid coordinates 104-064)
The militia observation post at the peak of Gur Dur (grid coordinates 080-061)
Ignore the other two locations and rotate the drone's camera in the direction of the coltan mines at Feruz Abad. The objective (and mission) will end shortly after you confirm the presence of the military trucks that took the survivors away.
Optional 5: Save the Villagers[]
The bandit camp is located at grid coordinates 093-053. It consists of ten raiders, one of whom will be manning an SPG-9 turret and three carrying RPGs. Don't worry about conserving ammunition. As Herrera, spam HE shells as you can quickly rearm from the trucks back at FOS Planck once this objective is done.
Depending on the playthrough, you could encounter only eight bandits rather than the full ten as they have a 31%-62% of spawning. Herrera should have no problems taking out the camp but be careful not to get trapped by the rocks/trees. Drake and Graves can assist if they want to but it's not necessary.
Once the last bandit has fallen, this objective will be marked complete and the anti-government guerillas will firmly join your side.
Tips[]
As Herrera (or in singleplayer), make sure the convoy is set to follow in Column formation rather than Column (compact), Line, Wedge, Vee or worse, Staggered Column. Otherwise, they will continually attempt to overtake your tank and/or get stuck behind rocks. Some of the IFV crews may even cross into the line of fire of one another and inadvertently disable or injure/kill friendly crews.
Remember to get logistics support at FOS Planck if you run low on ammunition, require hull repairs or need to refuel.
Equipping the M107 as Graves and having another member of the team wielding the MAAWS is a good choice as it gives you a decent balance of firepower. Just keep in mind that you'll be useless for CQB, however.
In singleplayer, Cruncher's AI is extremely unreliable and may often crash into the ground or get shot down by heavy machine gun fire. It is best not to rely on them for fire support unless you absolutely require their support.
There is no reason to object to the rebels' statements about the survivors unless you want to waste time manually searching for them yourself.
Trivia[]
Interestingly, internal scripting names used for the convoy vehicles suggest that the rear M2A2/M6 Bradleys were intended to be Stryker ICVs instead of Bradleys.
For performance reasons, the mission is scripted to disable AI and other interactive objects whenever the player(s) are not within proximity of various locations (i.e. FOS Planck, the coltan mines at Feruz Abad, etc.).
You can trigger a non-standard game over by provoking and luring the militia/Army troops back to the FOB. Doing so will cause them open fire on the control tower where COL Kane is located.
Whenever a checkpoint or military camp is seized, Takistani troops may randomly choose to surrender rather than continue fighting or running away.
If Pierce chooses to respawn after "dying" in the AH-64, he may end up in often hilarious positions that can result in the helicopter instantly exploding or starting in midair (without the rotors spun up).

